Chocolate Crinkle Mini Muffins

More mini muffins!  These are little bursts of flavor in your mouth that just keep giving, so you just keep eating, and eating, and eating!  But the good news is, they aren’t as bad for you as the traditional muffin so your waist line shouldn’t bear the brunt of over-indulging.  As you scan the ingredient list, don’t scoff at the banana. One measly banana does not justify skipping over to the next recipe. I will admit, I am the first one to avoid banana in baking- but not this time around. Try this recipe out, you’ll never even notice the banana! (And it’s the perfect solution for that one over ripe banana you can’t bear to eat but aren’t ready to chuck either). 

Chocolate Crinkle Mini MuffinsIMG_9201

(Makes about 24 mini muffins)


Ingredients:
2/3 cup sugar
1 banana
1 1/2 cups flour
1/4 cup cocoa powder
2 teaspoon baking powder
1/4 teaspoon salt
1 teaspoon cinnamon
1/4 cup canola oil
3/4 cup almond milk
1 teaspoon vanilla extract
1/2 cup powdered sugar

  1. Preheat the oven to 350 degrees. Prepare your muffin tin by spraying with vegetable oil.
  2. In a large bowl, smash the banana.  Add the sugar, and mix well.
  3. Add the canola oil, almond milk and vanilla extract to the banana sugar mixture.  Mix to combine ingredients.
  4. In a separate, small bowl. Add your dry ingredients and mix: flour, cocoa powder, baking powder, salt and cinnamon.
  5. Gradually add the dry ingredients to the large bowl of wet ingredients, stir gently.
  6. Fill muffin cups about 2/3 full.
  7. Bake about 15 minutes, until a toothpick inserted into the center comes out clean.
  8. Allow muffins to cool about 15 minutes in tin before removing and rolling them in the powdered sugar, coating the entire muffin.
  9. Allow to finish  cool on a wire cooling rack.
  10. Enjoy!


Stir-Fry Sesame Broccoli and Tofu

Tofu.  That strange food I would never have dared to bring to my lips (let alone swallow) when I was a kid.  Those days are ancient history.  Tofu has become a grocery store staple, you can usually find a block in my cheese drawer.  What else is a dairy free girl suppose to keep in there?  Combine tofu with my all time favorite ingredient, broccoli, and we have a winning meal.  This stir-fry is pretty easy and doesn’t require bizarre ingredients. If you can’t find mini corn, sub other veggies of your choice like water chestnuts, sweet pepper, onion etc.  

Stir-Fry Sesame Broccoli and Tofu

Ingredients:
1 block firm tofu
3 cups broccoli florets (bite size)
8 oz mini corn
vegetable oilIMG_4288
3 cloves garlic, minced
¾ cups vegetable stock
2 tablespoons sesame oil
soy sauce, to taste
1 tablespoon sesame seeds
1 teaspoon arrowroot

  1. Prepare the tofu by removing it from its packaging, draining it, and cutting it into large 1 inch blocks.  Heat a small sauce pan of water until it is boiling, then remove the pan from the heat and place the tofu in the hot water.  Allow the tofu to sit in the hot water until you are ready to use it, and then carefully drain the tofu. 
  2. Meanwhile, in a large sauté pan or wok, heat 1-2 tablespoons of vegetable oil.  Sauté the minced garlic on medium heat. 
  3. On high heat, add the mini corn and sauté until they begin to brown. 
  4. Add the broccoli and sauté on high heat until the broccoli is tender.  Remove the vegetables from the pan and set aside.
  5. Turn the heat down to medium, add the vegetable stock, sesame seeds and arrowroot to the pan, whisking constantly until the broth thickens.
  6. Add the vegetables and tofu to the stove, heat until the tofu is hot.
  7. Drizzle with sesame oil, and season with soy sauce to taste.  Serve over rice or noodles. 

Sticking To Your Guns

Living dairy free isn’t always easy.  Living gluten free isn’t easy.  The list goes on and on.  Basically not eating everything and Imagebeing particular about what you eat, no matter the reason behind it, isn’t easy.  Now let’s multiple the challenges of a diet by the challenges of travel, holidays, eating out… we are creating a recipe for a major diet derailment! Despite all of these challenges I do my best to stick to my guns when it comes to food and I never go hungry and am never forced to break my dairy free lifestyle (lacking the will power is another issue.)  

How do you handle all these challenges?   I’ve learned the hard way on more than one occasion,and as a result have developed a few navigation tools when it comes to negotiating the challenges of dietary restrictions.

Dining with friends and family:
I always offer to bring something.  I casually inquire about the meal, or forgo that and just bring something that goes with the flow and requires little fuss.  For example: thanksgiving dinner.  So generally the stuffing, mashed potatoes and sometimes other veggies are off limits to those who avoid dairy, along with dessert. My solution: bring a filling side and dessert.  This year I’m contributing sweet potato butternut squash puree, pumpkin roll, and cranberry nantucket pie (because one dessert is never enough).
Dining out:
The wonderful thing about living in the year 2013 (almost 2014)… the internet!  Most restaurants post their menus online.  This can be a huge lifesaver!  I try to always review a menu in advance- scanning for dairy free options.  In general, there are a few really tough places: Italian, French and Indian.  Usually on the safer side: Chinese, Japanese and other Asian restaurants.  American fare is hit or miss- think of your butter based fried chicken wings, and cheese everything.  Salads are often the safest option.
On the road:
Traveling can be challenging.  I  load up on snacks and do my best to make educated food choices.  I look for restaurants that have salad bars, vegetarian options, or have some known favorites.  I find places that have a good selection of vegetarian options often are more accommodating in general and usually welcome the occasional question about ingredients. 

Breakfast on the go tends to be one of my biggest challenges: pancakes (have milk or butter) cereal and yogurt… I get a tummy-ache just thinking about it.  Safe options for breakfast include fresh fruit and your own food.  Eggs can be a great choice- but only if you are certain they do not include any milk.  If I’m on the road for a few days, I seek out a grocery store and load up or stop there for breakfast to grab a dairy free yogurt, granola and fruit.  I often travel with my own almond milk (my dairy free milk of choice) to use in my cereal.  It’s also not unheard of for me to pack my own granola and dried fruit, pick up a cold yogurt and call it a meal (or snack).  Airports can be really rough for food- you are generally limited on time and the choices often dismal- all the more reason to load up on go food in advance if absolutely necessary- grab an astronomically priced salad at a grab and go.

The lesson I’ve learned with all of this? It’s totally worth it!  Making the decision to go dairy free was not an easy one, nor one I came to lightly.  However, it has changed my life for the better in ways I could have never imagined. I am more mindful of what I choose to consume, I read labels more carefully, and in general I make healthier decisions about the food I eat. Have I ever experienced a dairy binge? Absolutely! To summarize and spare you the dirty details- I have had a period of time where I lack all self control and lapse into a downward spiral of bad eating habits. The outcome is usually migraines, vomiting… etc etc.  You’d think I’d learn the first time around.  But NO!  I’ll admit I’m not perfect and this has happened on more than one occasion.  I always recover, pick myself up by my bootstraps and make a promise to myself that next time I will stick to my guns and remain dairy free.

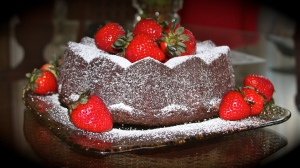
Wacky Pumpkin Bundt Cake

Have you ever had a wacky cake? Wacky cake recipes originated during the depression, wacky cake recipes rely on vinegar and baking soda as the rising agents and are always egg free.  This is a new spin on a classic recipe, and I think it is a delicious cake worthy of any time of day- breakfast, snack or a traditional dessert.

Wacky Pumpkin Bundt Cake  IMG_6969

Cake Ingredients:
3 cups flour
2 cups sugar
1 Tablespoon cocoa
2 Tablespoons ground cinnamon
1 teaspoon ground nutmeg
½ teaspoon ground cloves
1 teaspoon salt
2 teaspoon baking soda
1 15oz can pumpkin puree
1 ½ cups water
½ cup canola oil
2 Tablespoons apple cider vinegar
2 teaspoons almond extract
Maple-Cinnamon Glaze
1 cup powdered sugar
¼ cup pure maple syrup
1 teaspoon canola oil
½ teaspoon ground cinnamon

  1. Preheat the oven to 350 degrees. Prepare your bundt pan by greasing and flouring it- set aside.
  2. In a large bowl, mix together flour, sugar, cocoa, cinnamon, nutmeg, cloves, salt, and baking soda.
  3. In a separate bowl whisk together the pumpkin, water, oil, vinegar and almond extract.
  4. Combine the wet ingredients with the dry, whisking until they are thoroughly mixed. Pour the batter into the bundt pan.
  5. Bake for 60 minutes, or until a toothpick comes out clean when inserted into the center.
  6. Allow cake to cool in pan for 5 minutes, then  turn upside down on a cooling rack and allow to cool completely. Once it has totally cooled you can transfer to a serving plate.
  7. Prepare the glaze by combining the glaze ingredients and mixing thoroughly, drizzle over cake.
  8. Serve and enjoy!

Back to Basics: Quinoa

Quinoa.  A mysterious food that has recently gained popularity and is becoming more common.  Let’s debunk some of the mystery surrounding this  so called Superfood.  Not only is quinoa very simple to make, it is both nutritious and delicious! It pairs well with just about anything- it is often prepared like rice and can often be used as a substitution for rice.  First, let’s cover the basics.  

Pronunciation: Quinoa: Kin-wa. 
What is it? Quinoa is a seed.  
Nutrition: Quinoa contains calcium, phosphorus, iron, fiber, magnesium. It is also considered a good source of protein. 
IMG_5662Where to find quinoa: Quinoa can now be found in most large grocery stores. Check by the rice and grain section, if all else fails check the natural/organic food section.  It can be purchased in pre-packaged amounts or sometimes in bulk.  (Like rice)

How to make quinoa:

Ingredients:
1 cup dry quinoa
2 cups water

  1. Rinse the quinoa under cold water.  (otherwise it gets too mushy when prepared)
  2. Add quinoa and water to small sauce pan, uncovered bring to a boil.
  3. Reduce to a low simmer, cover and allow to simmer for 15-20 minutes (or until most of the water has been absorbed).
  4. Remove from heat, “fluff” with a fork and allow to sit for 5-10 minutes before serving.

Serving suggestions and variations:

  • Substitute veggie or chicken stock for water
  • Substitute lite coconut milk for water
  • Add spices or cooked veggies to quinoa before cooking
  • Add dried fruit to quinoa before cooking

Roasted Corn Guacamole

This is a variation of a theme- Guac with Roasted Corn.  Its creation has a story, of course.  My intention was to make some tried and true guacamole dip to have, not to mention I had 3 avocados in the fridge.  Well, turns out the avocados were just a bit past their prime (understatement) and a trip to the grocery store was out of the question.  I salvaged what I could and was left with the ready minced ingredients for guacamole plus about 1/2 the necessary avocado   What to do?  I rummaged the fridge- nothing, on to the freezer- AH HA!  I spotted a forgotten bag of frozen corn.  I defrosted some corn, and roasted it in the toaster oven  (yes, at this point I was too lazy to preheat and use the oven).  Goes to show you, sometimes the tasty treats in the kitchen come from the most unexpected inspirations and turn of events. (And since it’s corn season, some fresh rosted corn would be absolutely DELISH in this recipe.)

Tomato and Red Onion

Roasted Corn Guacamole
Ingredients:
2 Haas Avocados (NOT Florida Avocado, I find they are too watery and lack flavor)
1 cup  Red onion, chunked
1/2 cup Fresh Cilantro leaves
5 Cherry Tomatoes (or 1 Plum Tomato), halved
1 Lime
1/2 Jalapeño Pepper (optional to taste) (deseeded)
1 cup Corn (defrosted if using frozen)
 
If you prefer not to chop- use your food processor!  I have more than once made this recipe in a pinch without one.

  1. Preheat the oven to 450 degrees (I used the toaster oven).  Spray oven tray with olive oil, spread corn on tray and roast for 8-10 minutes or until corn begins to brown.  Remove from toaster and allow to cool.
  2. Carefully rinse the cilantro- you want to be sure to remove any sand or dirt that might add any unwanted crunch to your guacamole.  Pinch the leaves off of the stems, about 1/4 cup loosely packed, adding them to the food processor.
  3. Add the cilantro and pepper to the food processor and let it rip.
  4. Once the cilantro and pepper are finely minced, add the onion and cherry tomatoes to the food processor until all ingredients are to a size of your liking.
  5. Cut the lime in half, juicing into bowl of ingredients- reserve 1/2 of a lime.
  6. Cut the avocados in half, remove the seed, scoop the avocado out of the skin and into the bowl of ingredients.  Mash the avocado to taste, I prefer small chunks. Mix all ingredients together, including the cooled roasted corn.
  7. Once this is complete, transfer guacamole to serving dish, squeeze remaining lime juice onto top of guacamole. Do not mix in the juice, it will help keep the avocado green.
  8. Cover tightly, allow guacamole to chill for a few hours before serving.  Serve with corn chips.


Simple Vegan Chocolate Cake (Joy the Baker)

IMG_4396This is a big ‘ole YUM.  The recipe is perfect as is and required no substitutions or changes.  Joy the Baker knows how to bake (go figure, right?).  I brought this cake to a dinner party and it was a big hit.  It’s not unusual for us to go home with the leftovers of the dish we brought to contribute to the party.  Not this time.  The little bit of remaining cake got divided up among guests and went home with all who attended (full disclosure  it was a small party).  This  chocolate cake was easy to prepare, easy to bake and very easy to eat! It has the added bonus of being a truly simple recipe that did not require an extra trip to the store for special ingredients.  That is always a big win in my book.  Thanks to Joy the Baker for sharing this delicious Simple Vegan Chocolate Cake.  

To prepare, you’ll need to collect the following ingredients.  For instructions and additional inspiration, check out Joy the Baker’s blog.  There is no point in recreating the wheel on this one!  If it ain’t broke, don’t fix it! 🙂  

Happy Baking!

Vegan Chocolate Cake
Ingredients:
2 1/4 cups flour
1/2 cup cocoa powder
1 1/2 cups sugar
1 teaspoon baking soda
1/4 teaspoon baking powder
1/2 teaspoon salt
1 cup warm coffee
1/2 cup (plus 1 tablespoon) veggie oil
2 teaspoons vanilla extract
1/2 cup (or so) of chocolate chunks or chips (optional)

Instructions for baking this delicious creation HERE.


Refreshing Fruit Salad

Grapefruit

I have the food blahs this week, I’m totally uninspired and lack motivation to be creative in the kitchen.  What to do?  Make fruit salad!  It’s easy and cheerful.  No matter what time of year, I find that this recipe is very refreshing and delicious. I often make it in the summer as a grab and go or pot luck addition, it is also great to have on hand in the cold weather when you are looking for a healthy light side or snack- especially after (or during) the holiday season.  There are many variations of fruit salad, I happen to prefer mine without grapes and melon.  You’d be surprised as how delicious a sliced banana is when mixed with citrus- it maintains its independent flavor yet does not overpower the salad- I’d highly recommend it.

Refreshing Fruit Salad

Ingredients
1 Ruby Red Grapefruit
1 White Grapefruit
3 Naval Oranges
1 Granny Smith Apple (cored, peeling is optional)
1 Gala Apple (peeled & cored)
¼ cup orange juice

Optional:
2 kiwis (skinned)
1-2 bananas
8oz maraschino cherries, without stems (about half of a 16oz jar)

Timesaving kitchen tools:
Grapefruit knife
Grapefruit spoon
Citrus hand juicer
Chef’s Knife

  1.  To prepare the grapefruit, cut the grapefruit in half, use the grapefruit knife to go around the perimeter of the fruit between the sections and skin, then use a grapefruit spoon to individually scoop out each section of grapefruit. (I find that this method is a time saver in comparison to sectioning each section of grapefruit with the knife).  Use the juicer to extract any excess or remaining juice from the fruit.  Place the grapefruit sections and juice in a large bowl or pitcher of your choice.
  2. To prepare the oranges, repeat same steps as the grapefruit preparation.
  3. Cut the apples into bite size pieces, add to the bowl with the citrus, gently stirring immediately to prevent the apples from browning.
  4. Optional- add peeled, bite size pieces of kiwis or bananas.  For a kid friendly dish I recommend adding the cherries.
  5. Add the orange juice to taste- if the grapefruit flavor is too strong for your taste or if the fruit is not covered.
  6. Refrigerate and serve cold, excellent as a side, snack or dessert.

Butternut Squash with Spinach

In the coldest cold of the winter weather I find myself looking for an excuse to fire up the oven.  That means I’ll roast just about anything that isn’t tied down in the kitchen.  Butternut squash was the latest victim of my roasting obsession, and while the squash might disagree, I think the results were great!  

Butternut Squash with Spinach

Ingredients:Squash and Onion
2lbs Butternut Squash (peeled, cleaned and cut into 1 inch cubes)
1 sweet onion (cut into 1 inch chunks)
6oz fresh baby spinach
½ cup dried cherries
fresh ground nutmeg
kosher salt
fresh ground pepper
olive oil

  1. Toss the squash and onion with olive oil, salt and pepper. Sprinkle with fresh ground nutmeg. (This can be done in advance if necessary).
  2. Preheat oven to 425 degrees.
  3. Spread squash and onion on baking sheet, ensuring that the pan is not too crowded (otherwise the veggies will steam not roast). Roast in the oven for 30-40 minutes.  Turning once, midway through.
  4. Remove squash and onion from oven, in a large bowl, immediately toss with spinach and cherries, drizzle with additional olive oil if necessary.
  5. Serve hot and enjoy!

Snack Time! Strawberry Mandarin Orange “Salad”

It’s cold outside and I have been craving fruit like whoa.  Maybe because deep down I am dreaming of tropical beaches and white sand. I’m not sure.  Whatever the reason, I have recently discovered this delicious combination of fruit.  As a child I enjoyed mandarin oranges, but as an adult they rarely find their way into my cupboard, let alone onto the table.  Well, this snack never made it to the table, it went straight to my mouth, and quite quickly I might add.  I realize this recipe might not be the most elegant or sophisticated, but let’s face it.  When you love to eat (like me) it really doesn’t matter, and as long as it is delicious, and the simplicity of this recipe is an added bonus.  

Strawberry Mandarin Orange Salad Snack

Ingredients:
8oz Strawberries, rinsed and sliced (about ½ pound)
7oz Mandarin Orange in light syrup (about ½ 15oz can)

  1. IMG_3656Chill mandarin oranges.
  2. Drain mandarin oranges, reserve ¼ cup of syrup.
  3. Gently mix sliced strawberries with mandarin oranges.   Add mandarin orange syrup to taste (optional).
  4. Serve and enjoy!

Alternatives:

  • Drizzle with balsamic vinegar
  • Add toasted almond slivers
  • Add toasted coconut flakes